
How to Fix Windows 10 Does Not Shut Down Problem 2019, Windows 10 PC not shutting down. Windows 10 shuts down, but reboots Problem Solution. Windows 10 full shutdown not hibernate
Contents
Windows 10 Shutdown Problem
Windows 10 often solves problems when receiving updates, and often brings new problems. One of these problems in Windows 10 is that the computer does not shut down. In other words, it shuts down when it gives command to the Notebook or Desktop computer, but it automatically reboots.
Friends, this problem is caused by a problem with the Windows fast start feature. Windows 10 fast start saves your last session to disk when you shut down the computer. When you start the computer, windows opens your last session saved to disk. This will cause your computer to boot faster than a normal startup.
How to Fix Windows 10 Does Not Shut Down
Here is exactly what I can not determine; This problem may occur when updating the old session. Of course, this is not always the problem. Sometimes every 2 months, sometimes 1 month. I guess the more likely your problem is as your session file gets old.
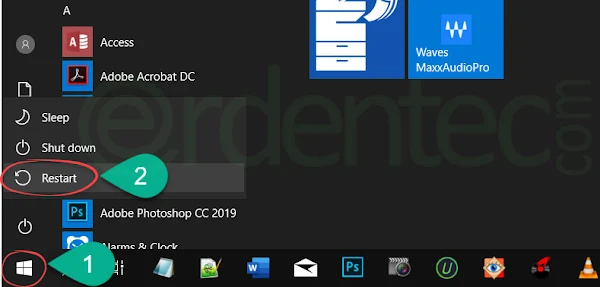
Restart Your Computer
If your computer does not shut down, first restart your computer instead of shutting down, and then try to shut down. This problem ceases when I restart my computer. If you do not want to experience this problem, restart your computer at least once a week. Because when you restart your computer this Windows 10 quick start file is also deleted. When you shut down the computer, it records a new session.
Workaround: Turn off Fast Start
If you turn off the Fast Start, there is no longer any chance of getting this problem. However, your computer will turn on a little later. If you can afford to turn on your computer a little later, you can turn off the quick start as described below.
- Press
 Win+R on your keyboard together.
 - The Run window will open. Type “powercfg.cpl” in the Open field and press the OK Button.

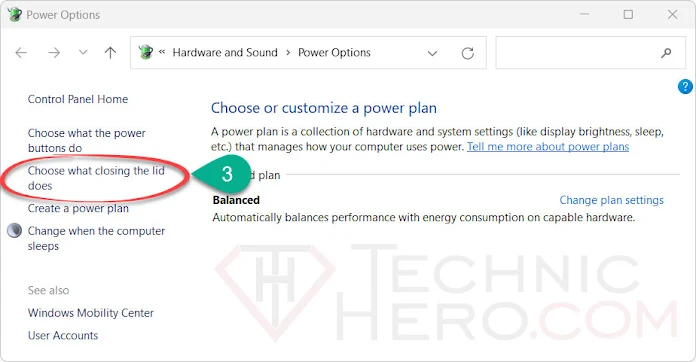
- In the power options window, click the “Choose what closing the lid does” link in the left panel.
- In the window that appears, click the “Change settings that are currently unavailable” link.

- Then uncheck “Turn on fast startup (recommended)” below and save the settings by clicking the “Save changes” button below.

- Finally, restart the computer.
Disable Fast start with the registry
If your power settings do not have a setting to turn off the fast start, you can turn off the fast start by running the following code. For this:
- Copy and paste the following code into a Notepad.1234Windows Registry Editor Version 5.00[HKEY_LOCAL_MACHINE\SYSTEM\CurrentControlSet\Control\Session Manager\Power]"HiberbootEnabled"=dword:00000000
- Save it as “Disable Fast Start.reg” on the Desktop.
- Make sure that the end is .reg
- Finally, double-click to open this file.
- Say “Yes” and “OK” to the warnings that appear.
- Finally, restart your computer.
Enable Fast start with the registry
- Copy and paste the following code into a Notepad.1234Windows Registry Editor Version 5.00[HKEY_LOCAL_MACHINE\SYSTEM\CurrentControlSet\Control\Session Manager\Power]"HiberbootEnabled"=dword:00000001
- Save it as “Enable Fast Start.reg” on the Desktop.
- Make sure that the end is .reg
- Finally, double-click to open this file.
- Say “Yes” and “OK” to the warnings that appear.
- Finally, restart your computer.


")
")
