
Create Bootable Windows USB Dirive Using Rufus, How to Prepare Bootable Install Media. Create UEFI Windows 10 USB Guide. Make Legacy Flash Drive Guide for Windows Installation. How to use Rufus to create a bootable USB drive
Create Bootable Windows USB Drive Using Rufus
Nowadays, we can boot Windows in 3 different ways. In addition to booting from the old DVD, we also have the possibility to boot via Network (we skip LAN boot because it is quite complicated) and USB. Nowadays, with the CD-DVD era gradually closing, we are now doing the Windows installations and Boot operations with the help of USB sticks.
UEFI Installation for GPT Disk: UEFI has become the standard in new generation motherboards. It has become a very important technology with both security and fast boot options. If your computer supports uefi, it would be better to use your system as uefi. In order to install UEFI, the hard drive you will install must be in GPT order.
LEGACY Installation for MBR Disk: The legacy boot feature used on older computers is still supported on most motherboards. If you are going to use legacy boot, the hard drive you will install must be in MBR format. We will explain how to prepare windows installation usb for both systems.

NOTE: Turning off your antivirus during USB preparation will increase the speed of operations and prevent possible errors.
Preparing Windows UEFI Installation with Rufus
Installation usb preparation process for new generation UEFI Bios is very simple. To do this, open the Rufus program and plug in your at least 8GB USB memory to the computer.

- Device: Here you select the USB drive where you will install Windows.
- Boot selection: Here you select the Windows ISO image with the “SELECT” button.
- Image Option: Leave it as standard Windows install.
- Partition scheme and Target System: Here we select the GPT Disk, ie UEFI installation type.
- Volume label: Here you can change the name given to your USB memory stick.
- File system: FAT32 (Default) should be selected for UEFI installation.
- Cluster size: We don’t touch here, we leave it whatever is default.
- START: If everything is ready, click the “START” button to start the process.
Preparing Windows LEGACY Installation with Rufus
Installation usb preparation process for old generation LEGACY Bios is quite simple. To do this, open the Rufus program and plug in your at least 8GB USB memory to the computer.
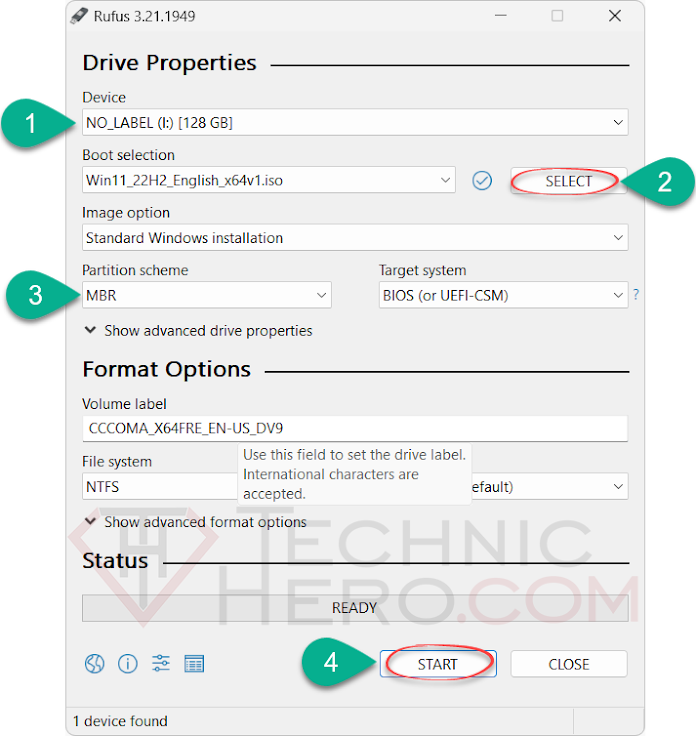
- Device: Here you select the USB drive where you will install Windows.
- Boot selection: Here you select the Windows ISO image with the “SELECT” button.
- Image Option: Leave it as standard Windows install.
- Partition scheme and Target System: Here we choose MBR Disk, Legacy installation type. We leave the target system as the BIOS.
- Volume label: Here you can change the name given to your USB memory stick.
- File system: NTFS must be selected for Legacy installation.
- Cluster size: We don’t touch here, we just leave it whatever is default.
- START: If everything is ready, click the “START” button to start the process.Good work…


")

I really appreciate this post. I’ve been looking all over for this! Thank goodness I found it. You have made my day! Thx again