
The operation failed to complete because the Disk Management console view is not up-to-date. Refresh the view by using the refresh task. If the problem persist close the Disk Management console, then restart Disk Management or restart the computer.
Contents
The operation failed to complete because the Disk Management console view is not up-to-date.
There is sound when inserting flash memory, Flash Disk, or external disk into the computer, but the Flash disk is not visible. We will share a few methods on how to solve your problem. If your disk appears when you enter Disk Management but it is not visible on my computer, the following methods will probably solve your problem.
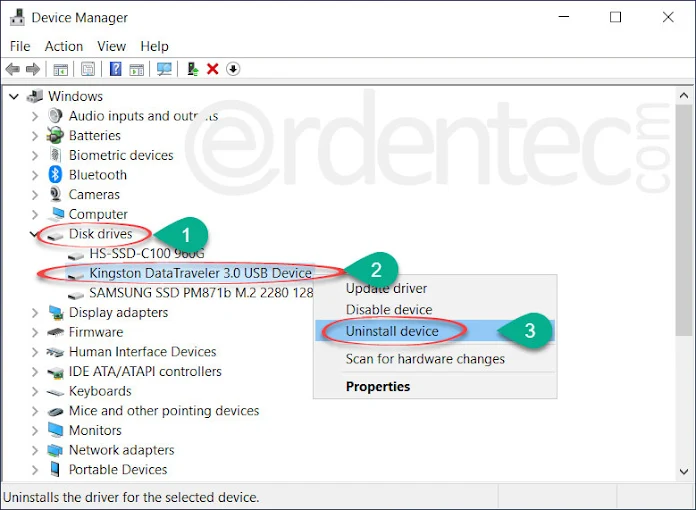
Removing and re-adding the Disc from the Device Manager
- First press the Win + R keys on the keyboard together. In the box that appears, type “devmgmt.msc”, and then press ENTER.

- There will be disks connected to your computer under “Disk drives” in the list. Here will be the brand and model of your flash disk, such as “Kingston DataTraveler 3.0 USB Device.” Right click on your disk with the mouse and say “Uninstall device”.
- Finally, Right-click the “Windows” option at the top of the list with the mouse and say “Scan for Hardware Changes”. Or click “Action> Scan Hardware Changes”.
As a result of this process, the hardware will be removed, scanned again and your disk will be visible. If it does not reappear, remove and insert the disc.
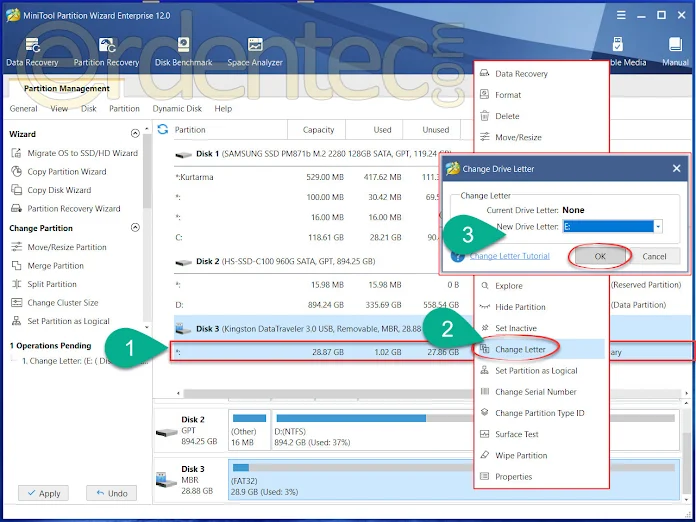
Showing the disc with the MiniTool Partition Wizard
- From here, download and install the MiniTool Partition Wizard Free Edition Program on your computer.
- Discs and partitions will appear in the program. Here we right-click the disc or partition that is missing or not visible and press “Set Active” If there is no Sec Active option, skip this step.
- Right click on the partition or disk again, select “Change Letter”.
- In the window that opens, select a letter in the “New Drive Letter” list and press the “OK” Button.
- Finally, click the “Apply” button in the lower left corner of the MiniTool Partition Wizard program and apply the processes. (Or press Ctrl + A)
- If the program prompts you to restart your computer, restart it.
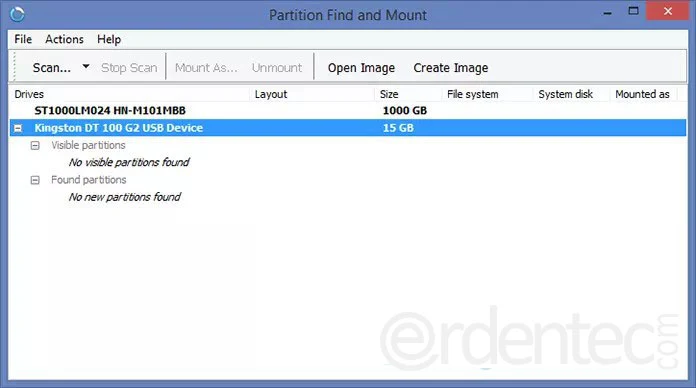
Bring back the lost part with Partition Find and Mounte
- Download and install the Partition Find and Mount program from here.
- After installing the program, open it.
- Select your HDD in the program and choose “Scan” and “Full Scan” from the “Actions” menu.
- When the scan is finished, it is enough to select the partition you want to save in the place that says “Found partitions” and press the “Mount as” button.
If you still have not received any results as a result of these transactions. It may be caused by your operating system. You can try the following method to check if there are errors on your Windows computer and to fix the errors automatically, if any.
Try Windows error checking and repair
- To run the Windows scan and repair tool: Type “cmd” in the start search box.
- Click on “Command Prompt” in the results.
- Enter “sfc /scannow” command in the black window that opens and press ENTER.
- Your system will be scanned for an estimated 20 minutes and any problems will be found and attempted to be corrected automatically.
- Restart the computer when scanning or correction is finished.


")
