![Remove ROOT, How to Unroot Android Devices? [Guide]](https://technichero.com/wp-content/uploads/2022/01/Remove-ROOT.webp "Remove-ROOT")
Remove ROOT, How to Unroot Android Devices? Sometimes we look for some changes in our lives and root our phones or we see that our phone is rooted when we take it from a repairer. How can we unroot our phones in such situations? Well, here are some ways!
You may wish to Unroot your Android Devices after rooting them. Some security related applications like banking applications may not work on rooted devices. Thus, you may wish to unroot your devices.
Contents
Remove ROOT
When you root an Android Device, it means that you have all the permission to do any kind of changes on it. Most of applications from Google Play Store work on rooted devices. However, they are mostly tools. You can remove unnecessary system files, apply your own settings to the device, cheat on mobile games and change system settings when you root your Android phone.
However, there are some disadvantages of rooting on the contrary to the benefits given above. When you root your device, it has no longer warranty, some banking applications do not work and also the device is more vulnerable to spywares and viruses. Thus, you may wish to unroot your device to avoid such disadvantages.
How to Unroot on Android Devices?
When you root your Android device, it breaks bootloader, adds Su Code to system/xbin section and installs Superuser application. You can unroot your mobile phone with the method we will explain below but it will not get your phone back to original state. For instance, banking applications will not give a warning about rooting but the phone will not update softwares either. You need to install Stock Rom to get your phone back to original factory defaults. However it is kind of complicated. So, unrooting your device to get rid of disadvantages that we mentioned above will be enough.
If your Android device is rooted, then it means that you have a Root access manager. SuperSU, Superuser, Kinguser and similar ones are among these root access managers. You can manage authorization via such applications and decide which applications will have root permissions. After finding out which root access manager you use, you should get to the next step.
Unroot with Magisk
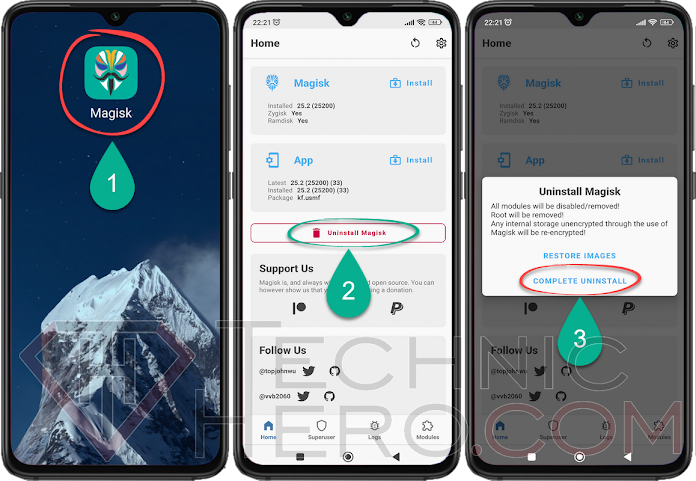
- Find Magisk application on your Android device and open it.
- On the Magisk Home screen you will see the “Uninstall Magisk” button, click the button.
- Then click “COMPLETE UNINSTALL”.
- Magisk will start to uninstall itself. At the end of the process, the phone will automatically reboot.
Unroot with SuperSU
- Find SuperSU application on your Android device and open it.
- Then get to the “Settings”
- Under the Cleanup heading, select “Unroot”
- Click on “Continue”.
- You will see “Succesfully Unrooted”
- Last step, restart your mobile phone.
Unroot with KingRoot
- Find KingRoot on your Android device and open it.
- Then click on ” ⋮ ” button located on right top side.
- After that, click on “General Settings”
- Under the “Uninstall and Clear Root” heading, click on “Uninstall KingRoot”
- Click on “Continue”
- Lastly, restart your mobile phone.

You can unroot your phone with the same method if you don’t use either SuperSU or KingRoot. The settings will be very similar.
Unroot with Impactor Unroot in Just One Click
There is an application simplifying unrooting process in Google Play Store. You can unroot your devices through this application in a few simple steps. Install Impactor Unroot application on your phone and open it. It will ask for root permission at the launch, click on ALLOW button. The application will verify that your device is already rooted and the Root Check will be green.
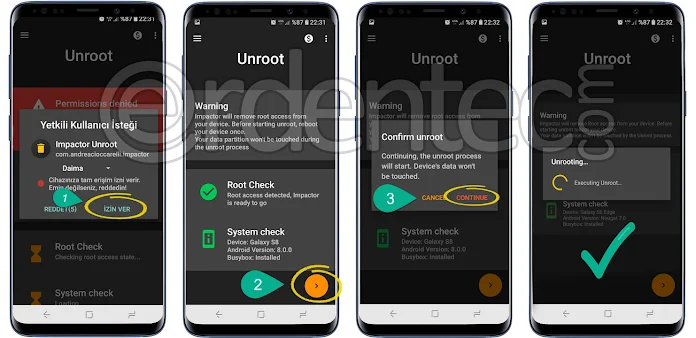
To unroot your device: Click on Orange Arrow Icon. It will pop out Confirm Unroot window. Click on CONTINUE button and wait for unrooting. It may restart your mobile phone after unrooting process is finished.
Unroot with Kingo ROOT
As most of Android users know, we can root our Android devices with Kingo Root application. Additionally, Kingo Root has also Unrooting feature as well now. To be able to unroot your device with Kingo ROOT, first you must activate USB Debugging.
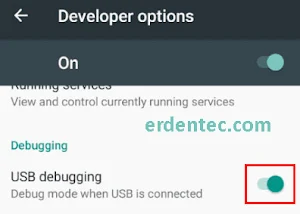
- To be able to open developer settings: Firstly, go Settings > About Device > Software Information.
- Here, click on “Build Number” section 5-6 times repeatedly until it says “You are now a developer”
- Then, go to Developer Settings and activate USB Debugging.
Step 1: Firstly, download application on your computer and install it. If you have already opened Developer Settings, then open Kingo ROOT as well. Connect your phone to your computer via USB cable.
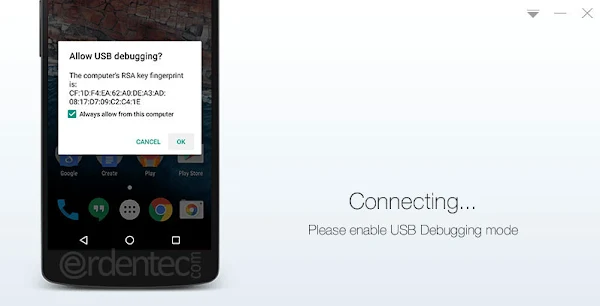
Step 2: You will see a warning saying “Allow USB Debugging?”. Click on “Always Allow on this computer” and press OK. After this step, it will ask for your Root permission. Click on “Allow” button.
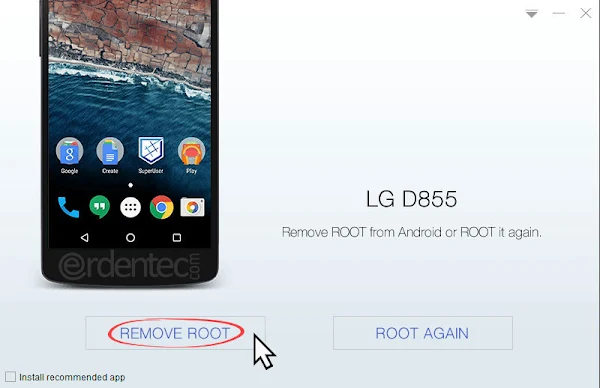
Step 3: If your device is seen by the application and there is a button REMOVE ROOT like the picture above, click on it. It will unroot your mobile phone. This process may take 3-5 minutes.

Step 4: Click on “Finish” button when you see “Remove ROOT Succeeded” notification. It will restart your phone unrooted.
Unroot Your Phone Manually
You need a file manager with Root support to Remove Root your device manually. We suggest you to use Root Explorer or ES File Explorer applications. You can download these applications from Google Play Store. We will explain this on Root Explorer.
- Open Root Explorer and click on “Allow” when it asks for root permission.
- Then, go to Root tab.
- Enter System/app
- Here, delete the file named SuperSU or
- After that, find System/xbin
- Find the file named “Su”
- Finally, restart your phone
Install Stock Rom – Back to Original Software
If the methods given above do not work to Remove ROOT your device, then you must install Stock Rom on your phone. Since Stock Rom and installing method of it vary from device to device, we will not be able to explain how to do this with one example. However, you can check Stock Rom section on our website and find detailed information about our Stock Rom guides.


")
