
How to Change DNS Server on Windows 10, Changing Your DNS Settings on Windows 10, How to set up iPv4 DNS on Windows computers? Change IPv4 DNS Server Address in Windows. How to change DNS address to faster resolvers on Windows 10
What is DNS? What does it do?
DNS ie Domain Name System, Web sites have ip addresses. Domain name concept has emerged because it will be difficult to memorize these ip addresses. This is where the task of DNS emerges. The name of the Internet site we entered into the Internet browser, that is, the domain name is converted to the IP address of that site.
Why change DNS?
DNS servers have a certain speed when converting domain names to ip addresses. These speeds affect our connection to the Internet. A good DNS address will also affect your Internet speed. This leads us to change DNS. Today, the most widely used and fastest IPv6 DNS addresses are Google’s 8.8.8.8 , 8.8.4.4 IPv6 DNS addresses.
DNS Server List, Fastest IPv4 IPv6 DNS Address
Change DNS Server on Windows 10
Microsoft has made many changes in appearance in its latest favorite operating system, Windows 10. With these changes, the settings have changed for Windows 8 and Windows 7, so most users cannot find and make the settings they want. One of these topics is how to change DNS in Windows 10 … How do we change DNS in Windows 10? We have prepared for you as illustrated. Good luck with.
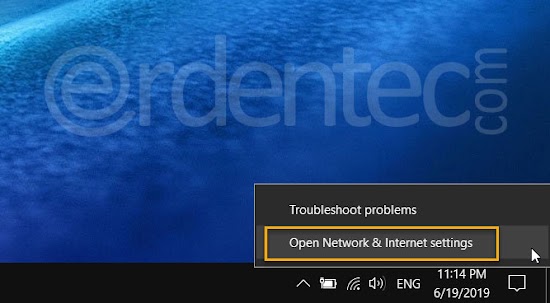
Step 1
Right-click on the Wifi or Network icon on your desktop in the lower right corner. In the menu that opens, click “Open Network & Internet settings.”
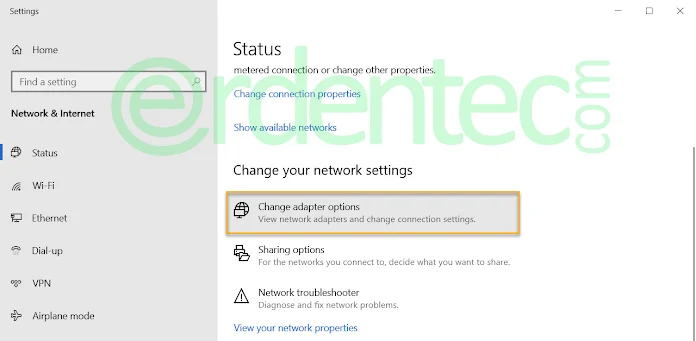
Step 2
In the new window that opens, scroll down a little and find “Change adapter options”.
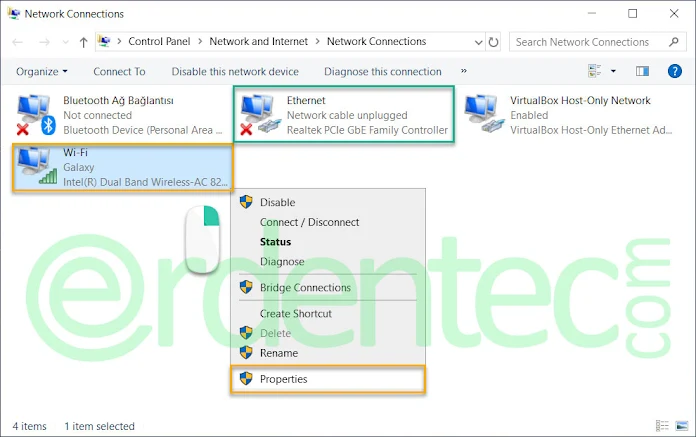
Step 3
In the window that opens, there are Network adapters, ie the devices to which you connect to the Internet. For example: Wifi adapter, such as Ethernet … If you connect to the Internet with a network cable here; Right-click the Wi-fi adapter if you are connecting via Ethernet, Wi-fi. In the window that opens, select Properties.
Step 4
Since I connected to the Internet using Wi-fi, I chose Wi-fi. Now the Wi-fi Properties screen is opened. Left-click on the Internet Protocol version 4 (TCP/IPv4) option, then click the Properties button.
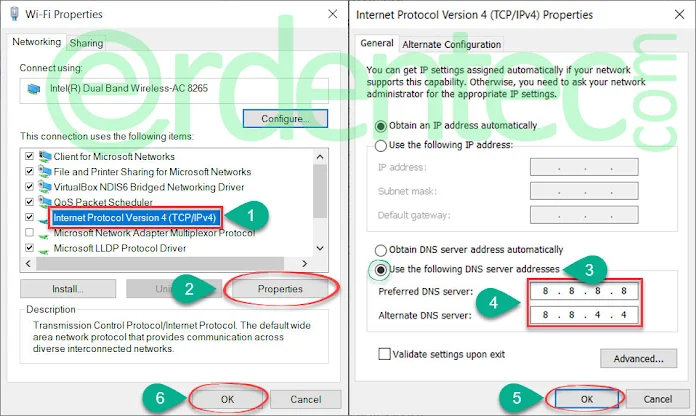
Step 5
A new window will open. Check the Use the following DNS server addresses: option. Then enter the DNS addresses to use in the Preferred DNS server: and Other DNS server: sections. Finally, click “OK” to save the changes.
> Congratulations, you have changed the DNS addresses of your Windows 10 computer. If you have more than one adapter, you must perform these operations for each. For example, if you connect with both the network cable and Wi-fi. You must make these settings for both Wi-fi and Ethernet.


")
