
How to ROOT Samsung Galaxy J7 Prime 2 and Install TWRP, Rooting Galaxy J7 Prime 2 SM-G611F Android 7.0 Nougat, Install TWRP Recovery on Samsung Galaxy J7 Prime 2
You can Root Samsung Galaxy J7 Prime 2 SM-G611F Model with the method that we show below.
WARNING: Before starting this process, make sure to back up user data like phonebook, applications, internal storage etc. since it is going to remove all of your data in your phone. Also, some of the applications may not work, it will end your phone’s warranty. You accept the responsibility for all of the possible consequences.
Find Out Your Phone’s Model Number
First of all, we need to learn our phone’s model number. To be able to do this, go to Settings / About Device and look at the code in Model Number section. If it is in the list below, then we get to Rooting process. For Instance: “SM-G611F”
Firstly, you need to download the tools. Install Samsung Mobile USB Drive to your computer. Unzip Odin3 program to your desktop. Leave TWRP.img.tar file that you have downloaded on your desktop. We will transfer other files to phone later on.
 Odin3 v3.13.1 Downlad
SAMSUNG Mobil USB Driver Download
no-verity-opt-encrypt-6.0.zip > Download
Magisk.zip > Download
MagiskManager.apk > Download
TWRP for SM-G611F: TWRP File / Alternative
How to Install TWRP on Samsung Galaxy J7 Prime 2
Step 1: Open Developer Options.
- Go to Settings > About Device > Software Information to enable Developer Options.
- Click on Build Number section 5-6 times repeatedly until you see “You are now a developer”
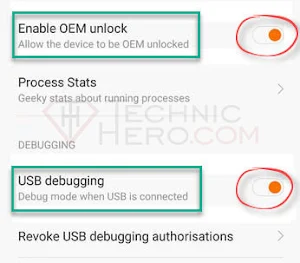
- Then go back to Developer Options and enable OEM Unlocking and USB Debugging
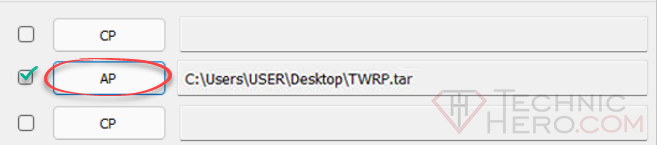
Step 2: Unzip “Odin.zip” folder that you have downloaded to your desktop. Make sure that TWRP files with .tar and .md5 extensions on desktop. Also, you need to be sure that these TWRP files that you have downloaded are compatible with your device’s model. After running Odin3.exe, click on “AP” button. Here, select TWRP-3.2.1 SM-G611F.tar file.
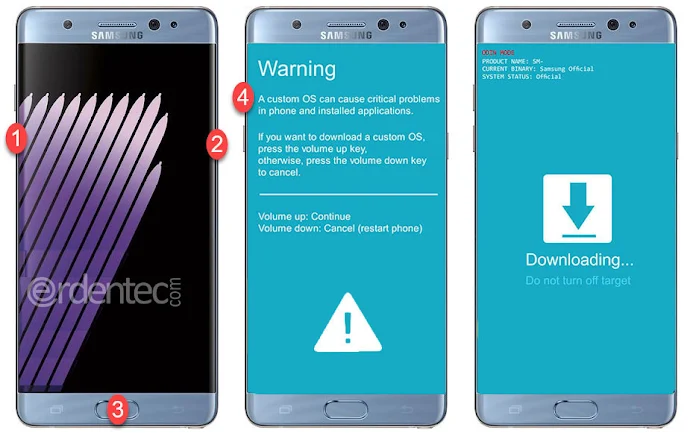
Step 3: Shut down your phone completely by holding power button. Then, press and hold on Volume Down + Home + Power buttons at the same time until Download Mode is started. When Download mode starts, press on Volume Up button once.
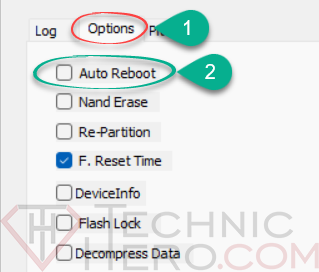
Step 4: IMPORTANT POINT: Before clicking on Start button, you need to disable Auto Reboot option on Odin. To do this, get to Options tab on Odin and disable “Auto-Reboot” option. If you don’t apply this change, then your device will get stuck on loading screen.
Step 5: Then, connect your phone to computer through USB Cable. You will see ID:COM point becoming BLUE on Odin. After ID:COM point becomes BLUE, then click on “Start” button to start the installation process.

Step 6: When TWRP installation is over, you will see PASS notification on Odin. At this point, you should unplug your phone from USB and activate TWRP Recovery Mode. To activate TWRP Mode, press and hold Volume Up + Home + Power buttons and release them when you see “SAMSUNG” on your screen. TWRP mode is active now.
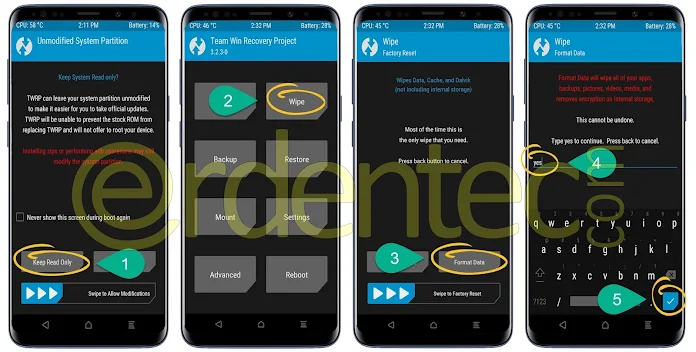
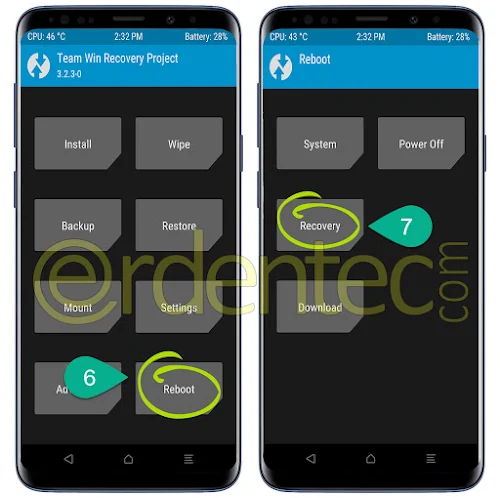
Step 7: When the device is in TWRP Mode, you should click on Keep Read Only button. Then, click on Wipe and Format Data buttons. Type or click on YES and press on Blue ENTER button. After that, go back to TWRP main page and click on Reboot > Recovery buttons respectively.
How to Root Samsung Galaxy J7 Prime 2
Step 8: It will restart your phone in TWRP mode. At this point, you should connect your phone through USB Cable again. Then, click on Keep Read Only button. You will see phone’s storage on your computer. Find no-verity-opt-encrypt-6.0.zip, Magisk.zip, MagiskManager.apk files that you have already download and transfer them into phone’s internal storage.
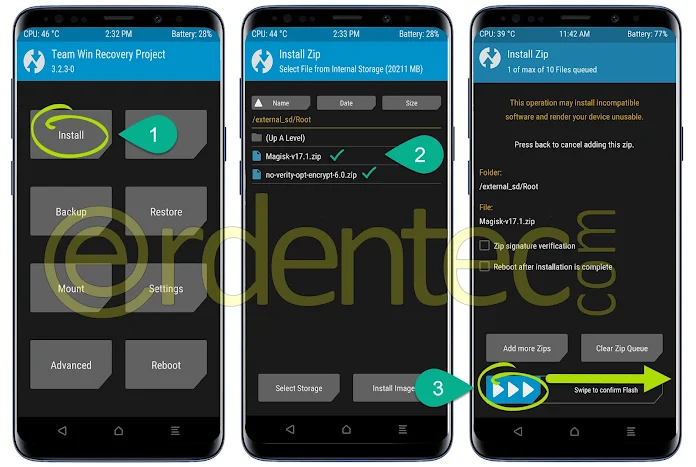
Step 9: At this point, you should click on Install button while you are on the TWRP main page. Later, select Magisk.zip file and swipe “Swipe to Install” button to right side. Go back to main page and apply the same process to no-verity-opt-encrypt-6.0.zip file. At the end of the process, you will have installed 2 zip files.
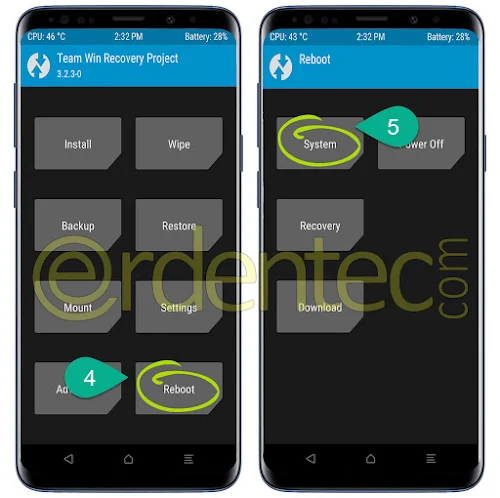
Step 10: Press on the home button to get back to TWRP main page. Click on Reboot > System buttons respectively. Your rooted phone will start afterwards.
Final Step: Finally, get in your phone’s file manager and install MagiskManager.apk on your phone. MagiskManager.apk is the application to give root authority just like SuperSU.


")

Can I use fot SM-G611FF/DS 8.0.0 And Thank You
Yes you can. But I didn’t test it.
after twrp use SuperSU-v2.82-201705271822 root 100%